


How to Measure Compression Springs for Replacement: A DIY Guide

ENTER YOUR DIMENSIONS
Select Your Spring Type

COMPRESSION

EXTENSION

TORSION
Select Your Unit of Measurement
Warning Messages
Table of contents
How Do You Accurately Measure a Spring for Replacement?
Replacing a compression spring might sound tricky, but with the right tips and tools, it’s easier than you think. Whether you’re tackling a broken spring in your screen door, dealing with a malfunctioning part in your favorite machine, or trying to bring life back to that comfy old recliner, getting the measurements right is the key to finding the perfect replacement. It’s not as daunting as it might seem at first, and with a little guidance, you’ll be surprised at how straightforward the process can be.
This DIY guide is here to help you every step of the way. We’ll break down exactly how to measure springs for replacement, so you can be confident you’re getting the job done right. Plus, we’ll introduce you to some handy tools from Acxess Spring that can make measuring and finding the perfect compression spring even easier. Whether you’re a seasoned DIYer or just starting out, this guide will equip you with the knowledge and tools you need to tackle your spring replacement project with confidence.
Understanding Compression Springs
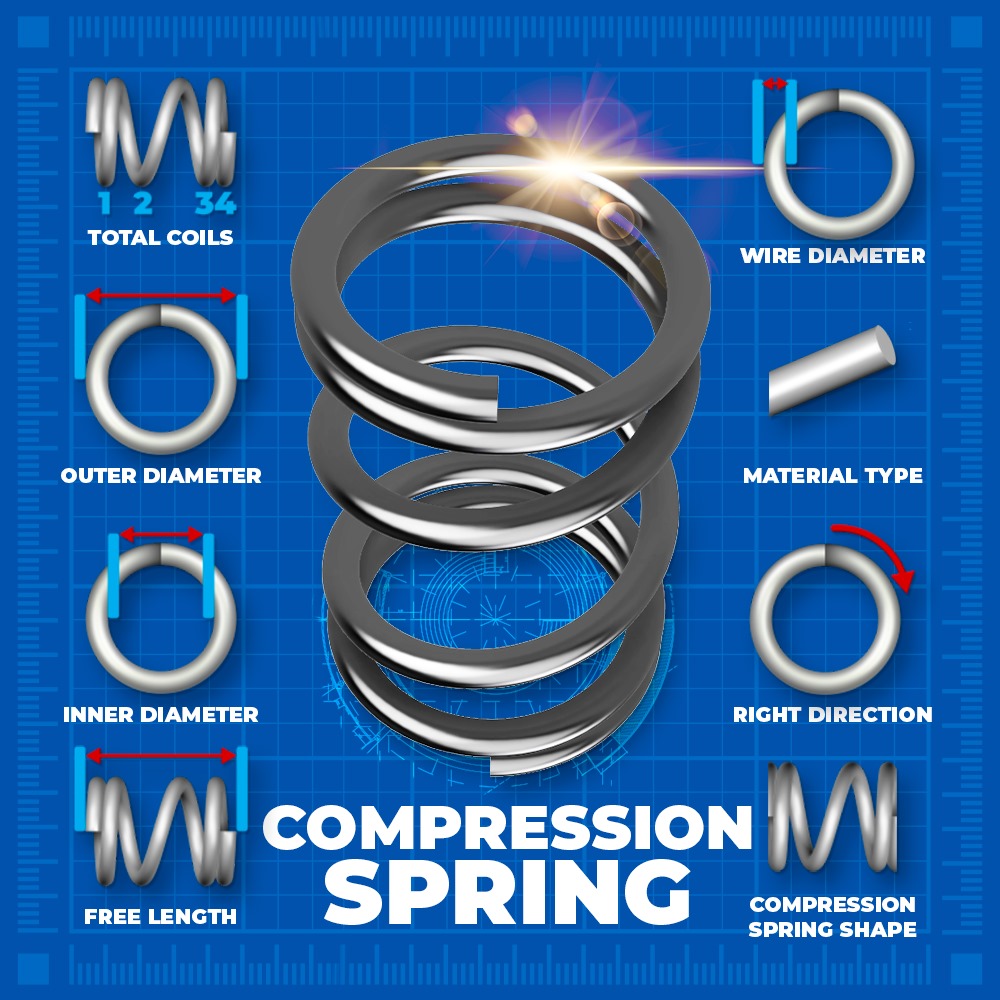
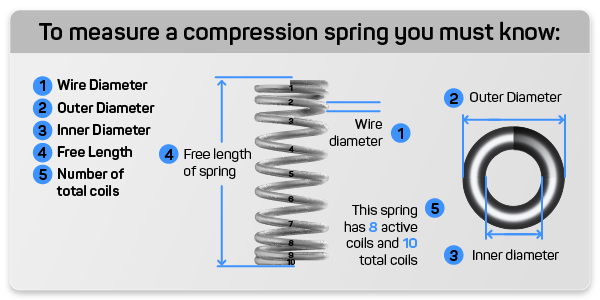
Compression springsare among the most ubiquitous components in mechanical systems, found in everything from simple ballpoint pens to complex automotive suspensions. These springs operate by compressing under load and then returning to their original shape when the load is removed, thereby storing and releasing energy as needed. This simple yet powerful mechanism is essential to countless devices and applications. To measure a compression spring accurately, you must first understand the various dimensions that define its characteristics and performance. These include the free length, outer diameter, wire diameter, total coils, solid height, and, in some cases, inner diameter. Each of these measurements plays a vital role in determining how the spring will behave under different conditions, making it essential to get them right when seeking a replacement.
Tools You'll Need
Before you embark on the task of measuring your compression spring, it’s important to have the right tools at hand. Accurate measurement requires more than just a ruler; you’ll need specialized equipment to ensure precision. A good set of dial or digital calipers is indispensable for measuring the wire diameter, outer diameter, and inner diameter with a high degree of accuracy. A good dial or digital caliper is useful for measuring the free length and solid height, while a micrometer can be an excellent tool for getting highly precise measurements of the wire diameter, especially if the spring is particularly small or if extreme accuracy is required. For those who are working on complex projects or require more advanced measurements, Acxess Spring offers an array of tools that can significantly enhance your ability to measure and design springs. The Online Spring Force Tester, for example, is perfect for determining the spring rate and validating the spring’s performance under load. Additionally, Acxess Spring’s 3D CAD Models and 3D Blueprints allow you to visualize and test the spring in a virtual environment before committing to a design, minimizing the risk of errors. Furthermore, the Instant Spring Quote tool can provide a fast and accurate price estimate based on your measurements, streamlining the ordering process and ensuring you get the exact spring you need. And for those who prefer visual instruction, Acxess Spring offers a series of videos that demonstrate how to measure each dimension of a compression spring. These resources are invaluable for ensuring accuracy and confidence in your measurements.

Step-by-Step Guide to Measuring a Compression Spring
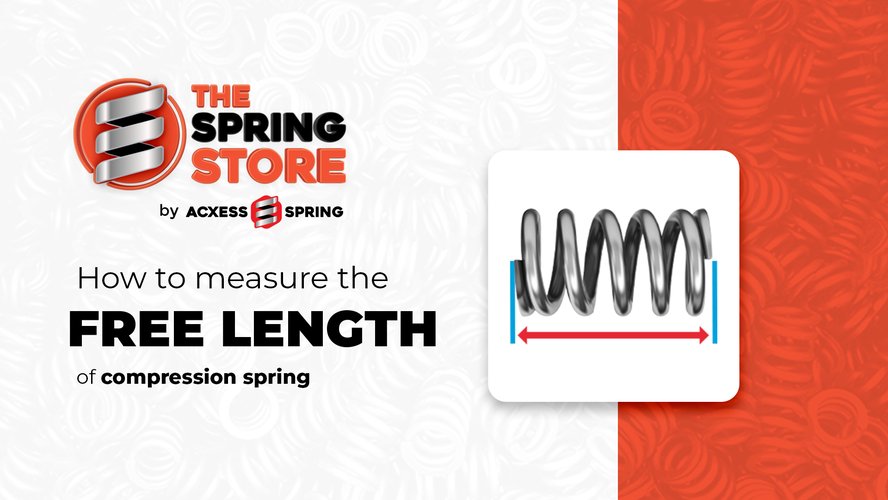
1. Measure the Free Length
The free length of a spring is one of the most straightforward measurements but also one of the most critical. This measurement represents the length of the spring when it is not compressed or under any load, essentially its relaxed state.
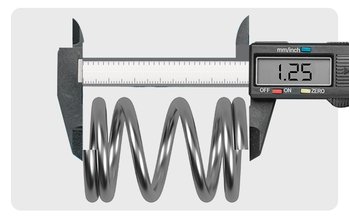
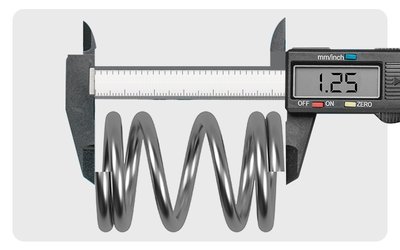
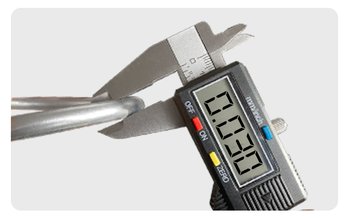
How to Measure: Place the compression spring horizontally inside the jaws of the calipers then slowly push the dial together so that the jaws of the calipers barely touch both sides of the springs. It’s important to measure the compression spring free length in a straight horizontal line, ensuring that the spring is neither stretched nor compressed during the measurement process. Thus giving new meaning to the word free length because you're measuring its length in a free uncompressed state.
Why It’s Important: The free length is crucial because it dictates how much space the spring will occupy in its application when it is not in use. A replacement spring that is too long or too short in its free length may not fit properly, leading to malfunctions or the need for further modifications. Ensuring that the free length of your replacement spring matches that of the original is the first step in securing a perfect fit.
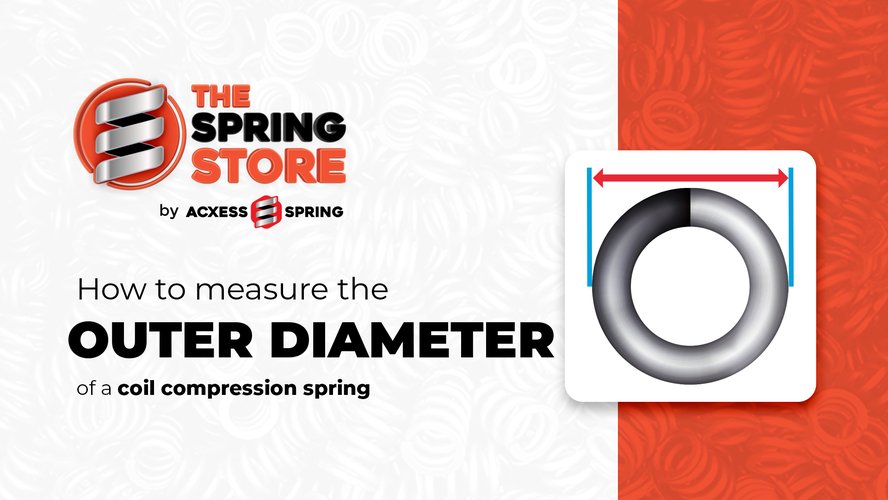
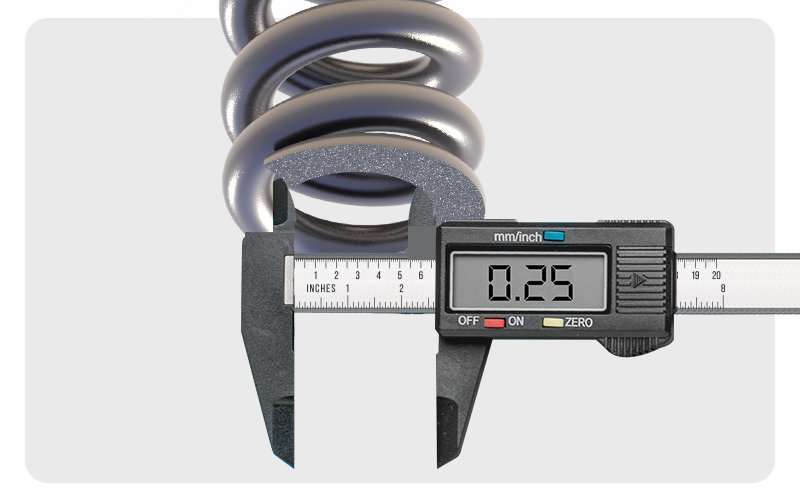
2. Measure the Outer Diameter (OD)
Thee outer diameter of a compression spring is the measurement across its widest point, and it is a key dimension for ensuring that the spring fits within the allocated space in your device or mechanism.
How to Measure: To measure the outer diameter accurately, use a pair of calipers, which are designed to provide precise measurements even at small scales. Position the calipers perpendicular to the spring’s coils and measure from one outer edge to the other. It’s essential to measure at multiple points along the spring to account for any slight variations in diameter that might occur due to manufacturing tolerances or wear and tear.
Why It’s Important: The outer diameter is crucial because it determines whether the spring will fit snugly within its housing or whether it might be too loose or too tight, both of which can affect the performance and longevity of the spring. A correct outer diameter ensures that the spring operates smoothly and efficiently within its designated space, without causing undue friction or movement that could lead to premature wear or failure.
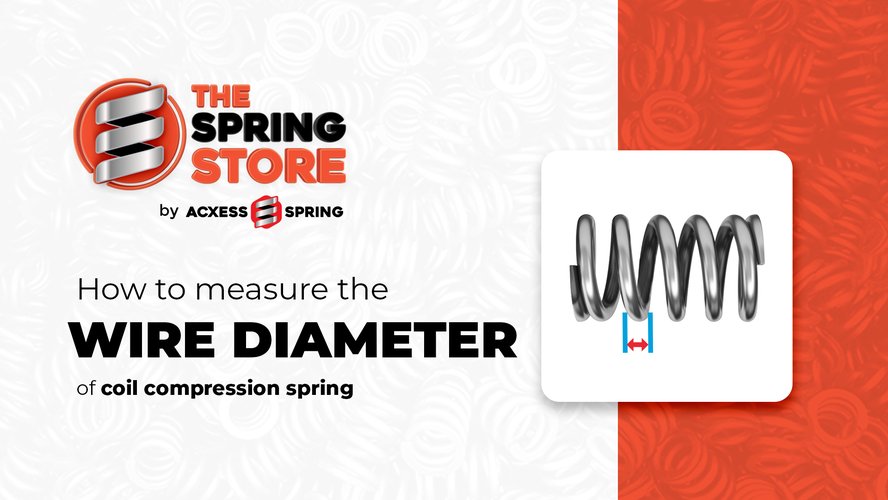
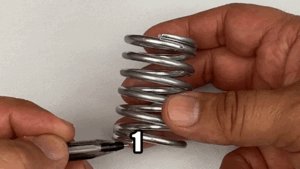
3. Measure the Wire Diameter
The wire diameter is perhaps the most critical measurement when it comes to determining the strength and load capacity of a compression spring. This measurement refers to the thickness of the wire used to create the spring’s coils, and even slight variations can have a significant impact on the spring’s performance.
How to Measure: To measure the wire diameter accurately, use a pair of calipers or a micrometer, as these tools can provide the precision needed to capture this measurement correctly. Place the calipers around the wire, ensuring that they are perpendicular to the coil and not skewed, which could result in an inaccurate reading. Measure the wire diameter in several places along the spring, as wear and deformation over time can cause variations in thickness.
Why It’s Important: The wire diameter is directly related to the spring rate, which is the amount of force required to compress the spring by a specific distance. A thicker wire generally means a stiffer spring, which may require more force to compress, while a thinner wire results in a more flexible weaker spring. Matching the wire diameter of your replacement spring to that of the original is crucial for maintaining the correct balance of strength and flexibility in your application.
4. Count the Total Coils
Why It’s Important: The total number of coils affects the spring rate and the maximum load the spring can handle; a spring with fewer coils will generally be stiffer, requiring more force to compress, while a spring with more coils will be softer and easier to compress under the same load. Accurate coil count is essential for ensuring that the replacement spring behaves similarly to the original, providing the correct amount of resistance and flexibility for your application.
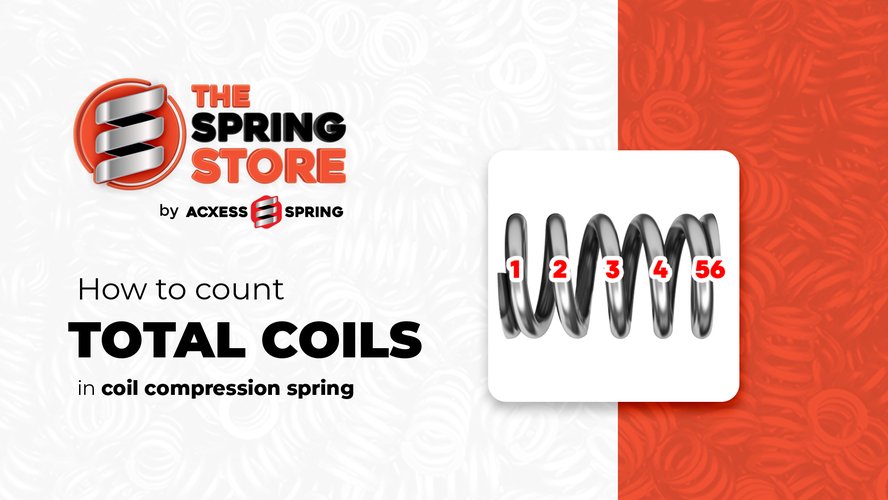
The total number of coils in a compression spring is another vital dimension that influences the spring’s flexibility and load-bearing capacity.
How to Measure: To count the total coils accurately, start at one end of the spring and count each full and partial coil until you reach the other end. It’s important to include any partial coils at the ends, as these contribute to the overall performance of the spring.
5. Measure the Solid Height
The solid height of a compression spring is the length of the spring when it is fully compressed, with all coils touching. This measurement is particularly important in applications where space is limited, as it determines how much room the spring will occupy when it is fully compressed. It’s important to note that not all compression springs are able to safely compress to Solid Height this is due to its type of compression spring design.
How to Measure: To measure the solid height, compress the spring until all coils are touching, then use a ruler or tape measure to determine the length from one end of the spring to the other. It’s important to ensure that the spring is fully compressed and that there is no space between the coils, as even a small gap can lead to an inaccurate measurement. If the spring is too strong for a pair of calipers use a table vise to compress the spring down to its solid height.
Why It’s Important: The solid height is critical in ensuring that the spring will fit within the available space when compressed, preventing issues such as jamming, incomplete compression, or mechanical failure. A replacement spring with an incorrect solid height may not function properly, leading to potential damage to the spring or the surrounding components.

6. Measure the Inner Diameter (ID) (Optional)
While not always necessary, measuring the inner diameter of a compression spring can be important in certain applications, particularly if the spring needs to fit over a rod or other component.
How to Measure: The inner diameter is the distance between the inner edges of the spring coils, and it can be measured using a pair of calipers. Place the calipers inside the spring and measure from one inner edge to the other, ensuring that the calipers are perpendicular to the coils for an accurate reading.
Why It’s Important: While the outer diameter is more commonly used, the inner diameter can be crucial in applications where the spring needs to slide over a shaft or fit within a tight space. Ensuring that the inner diameter matches the original spring is important for maintaining proper fit and function.
How to Find the Right Replacement Spring?
Once you've taken all the right measurements for your compression spring, the next step is to find the perfect replacement. Acxess Spring's Instant Spring Quote is an advanced tool that simplifies this process, helping you match your measurements with the right spring. Here’s how you can use it step by step:
Step 1: Identify Your Requirements
Before diving into the search for a replacement spring, it’s essential to clearly define the specifications and performance requirements. Start by ensuring you have all the critical dimensions, such as the wire diameter, outer diameter, free length, and total number of coils. These measurements are the foundation of finding a spring that will fit and function correctly in your application.
Next, consider the material. Depending on where and how the spring will be used, you might need a specific type of material. For example, Music Wire is ideal for high tensile strength and is a dark gray in color , Stainless Steel is best for environments where corrosion resistance is crucial and is the color of a nickel coin, and Chrome Silicone is suited for high-stress or high-temperature applications and is black in color. Don’t forget to consider environmental conditions like exposure to moisture, chemicals, or extreme temperatures, as these will influence your material choice.
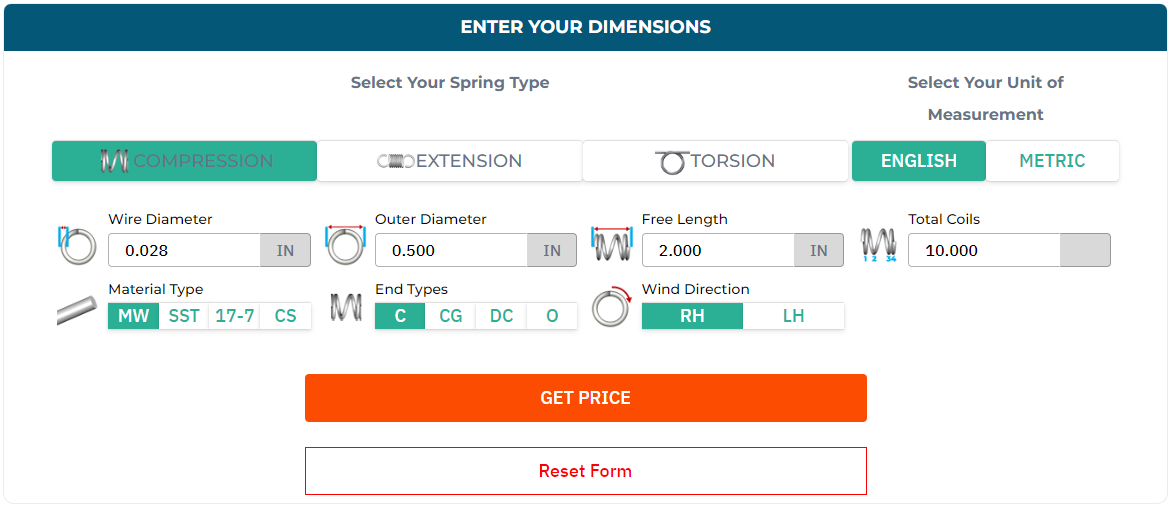
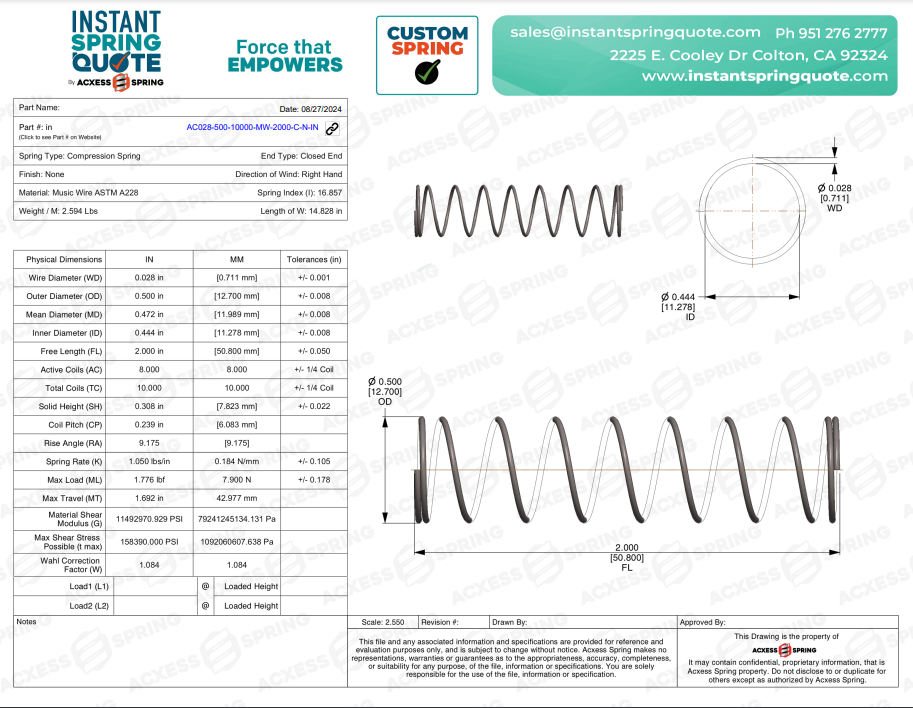
For this example, we’ll search for the replacement for a music wire compression spring with a wire diameter of 0.028 inches, an outer diameter of 0.500 inches, a 2 inches free length with 10 total coils.
Wire Diameter | 0.028 inches |
Outer Diameter | 0.500 inches |
Free Length | 2.000 inches |
Total Coils | 10 |
Material Type | Music Wire |
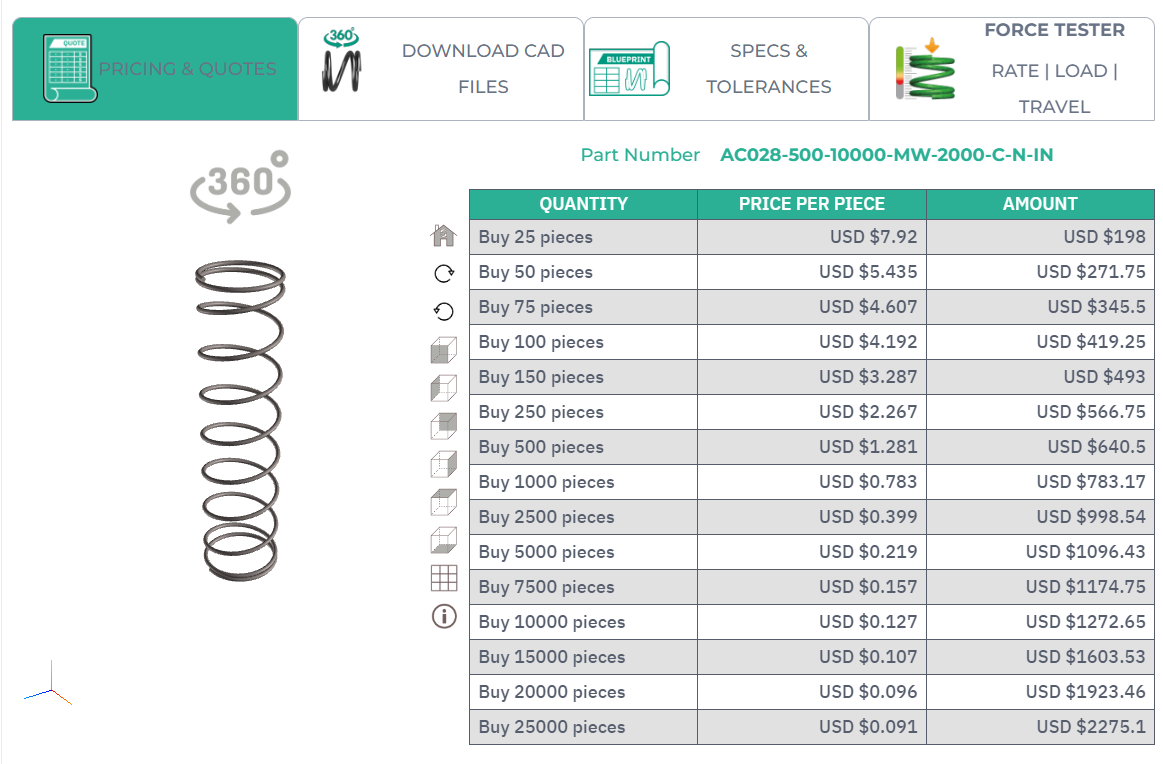
Step 2: Use Instant Spring Quote
Now that you have all your specifications, it's time to put them to use with advanced tools like Acxess Spring’s Instant Spring Quote. This powerful tool allows you to input your spring's dimensions and performance criteria, then generates a list of springs that meet your exact needs.
Start by entering the basic dimensions you measured, for this example we’ll search the replacement for a compression spring with a wire diameter of 0.028 inches, an outer diameter of 0.500 inches, a 2 inches free length with 10 total coils. Instant Spring Quote will sift through thousands of options to present you with springs that fit your criteria.
But that’s not all— Instant Spring Quote tool allows you to get a quote for custom springs almost instantly. This feature is especially useful if you’re working on a project with tight deadlines and need to know the cost and availability of a custom spring right away.
Step 3: Review Your Spring
It’s important to thoroughly review the specifications of the spring you’ve selected to ensure it meets all your requirements. This step is crucial to avoid any potential issues that could arise from a mismatch in dimensions or performance characteristics.
Start by going over each measurement and specification: double-check the wire diameter, outer diameter, free length, total number of coils, and material type against your original requirements. Make sure that the spring’s load capacity and spring rate align with what your application demands.
If you’re still unsure, you can consult Acxess Spring’s customer support team at sales@instantspringquote.com for expert advice. They can help you verify your choice and answer any questions you might have, ensuring that you’re making the best decision for your specific application.
Step 4: Conduct Performance Testing
Before finalizing your spring selection, it’s crucial to ensure that it will perform as needed in your specific application. Acxess Spring offers several tools that allow you to validate your spring’s performance before making a purchase.
One of the most valuable tools for this purpose is the Online Spring Force Tester (OSFT). The OSFT lets you simulate how the spring will behave under different loads to see how much it deflects or compresses, giving you a clear understanding of how the spring will operate in real-world use. This step is essential to ensure that the spring can handle the required stresses and will function properly in your application.

In addition to the OSFT, Acxess Spring provides 3D CAD models and 3D blueprints of your selected spring. These digital resources allow you to integrate the spring into your design software, where you can conduct virtual tests to see how it fits and functions within your assembly. Using 3D CAD models, you can visualize the spring in your product, checking for any potential issues with fitment or movement that could affect the spring’s performance.
For example, if you’re working on an automotive project, you can use the 3D blueprint to ensure that the spring’s dimensions and behavior under load match the precise requirements of your design. By running these simulations and tests, you can catch any potential problems before they become costly errors in production.
By combining the capabilities of the OSFT with the detailed insights provided by the compression spring 3D CAD models and 3D blueprints, you can thoroughly evaluate the spring’s performance and fitment, ensuring it’s the right choice for your application. This comprehensive testing step is key to achieving a successful, hassle-free replacement that meets all your needs.
Step 5: Evaluate Cost and Lead Time
Finally, when you’ve found a compression spring that meets your technical requirements, it’s time to consider the practical aspects of cost and lead time. Cost efficiency is important—compare quotes from different manufacturers to ensure you’re getting a competitive price for a high-quality product.
Lead time is another critical factor, especially if you’re working on a tight schedule. Choose a manufacturer who can deliver your springs within your project timeline without sacrificing quality. Acxess Spring is known for its competitive pricing and reliable lead times, so you can trust that your springs will arrive on time and meet your standards.
By following these steps, you can leverage Acxess Spring’s tools and resources to find the perfect compression spring for your needs, ensuring that your replacement process is smooth, efficient, and successful.
Common Mistakes to Avoid
Measuring compression springs may seem straightforward, but several common mistakes can lead to inaccurate measurements and poor replacement choices. Here are the key pitfalls to watch out for:
Incorrectly Measuring the Wire Diameter:
The wire diameter is a critical dimension that directly impacts the spring’s performance, including its spring rate and load capacity. Even a slight error in measuring the wire diameter can result in a spring that does not perform as expected. To avoid this, always use precision tools like digital or dial calipers or a micrometer to measure the wire diameter. It’s also a good idea to take multiple readings at different points along the wire to ensure consistency and accuracy.Neglecting to Measure the Solid Height:
Many DIYers overlook the importance of measuring the solid height—the length of the spring when it is fully compressed with all coils touching. By taking the measurement of solid height and dividing it by the wire diameter you can determine the total coils of the spring. This dimension is particularly crucial in applications where space is limited. If the solid height is not measured accurately, the replacement spring might not compress fully, leading to potential mechanical issues or even failure. Always ensure that you account for the solid height, especially in tight spaces.Ignoring Spring Fatigue:
Over time, springs can lose some of their original length or strength due to fatigue, especially if they have been in use for a long period. This wear and tear can result in a spring that no longer meets its original specifications. When measuring an old spring for replacement, it’s important to consider that the spring may have undergone fatigue. This means the measurements you take might not reflect the spring’s original dimensions or performance. Accounting for this factor when ordering a replacement can help ensure that the new spring will perform correctly.Misinterpreting the Spring Rate:
The spring rate is the amount of force required to compress the spring by one inch, and it is a crucial factor in determining whether the replacement spring will function as needed. Misinterpreting or inaccurately measuring the spring rate can lead to selecting a spring that is either too stiff or too soft for your application. To avoid this, use tools like the Online Spring Force Tester to accurately measure the spring rate, ensuring the replacement will provide the correct resistance and performance.
Ensuring a Perfect Fit for Your Compression Spring Replacement
Replacing a compression spring is a task that requires precision and attention to detail, but with the right tools and guidance, it’s a project that anyone can tackle successfully. By following this DIY guide and using the powerful tools and resources from Acxess Spring—such as the Instant Spring Quote, 3D CAD models, and Online Spring Force Tester—you can ensure that your replacement spring will fit and function perfectly. Accurate measurement is the key to a successful replacement, so take your time, double-check your measurements, and don’t hesitate to use Acxess Spring’s instructional videos to guide you through the process. With these resources at your disposal, you can confidently replace any compression spring and get your project back on track, knowing that you have the right spring for the job. Remember, precision is everything in spring replacement, and with Acxess Spring by your side, you can achieve the perfect fit every time.
- How Do You Accurately Measure a Spring for Replacement?
- Understanding Compression Springs
- Tools You'll Need
- Step-by-Step Guide to Measuring a Compression Spring
- 1. Measure the Free Length
- 2. Measure the Outer Diameter (OD)
- 3. Measure the Wire Diameter
- 4. Count the Total Coils
- 5. Measure the Solid Height
- 6. Measure the Inner Diameter (ID) (Optional)
- How to Find the Right Replacement Spring?
- Step 1: Identify Your Requirements
- Step 2: Use Instant Spring Quote
- Step 3: Review Your Spring
- Step 4: Conduct Performance Testing
- Step 5: Evaluate Cost and Lead Time
- Common Mistakes to Avoid
- Ensuring a Perfect Fit for Your Compression Spring Replacement